5 Tips to Get More Adventurous with Interior Paint Colors

Friday, September 12, 2014

Source: Michelle Workman


White walls dominate the design world currently, and most home stagers advise against taking interior risks in homes on the market. However, current homeowners not selling in the near future can and should paint their interiors to reflect personal styles. Even so, splashing fresh hues on walls isn’t something to do on a whim. Selecting new palettes requires ample research and debate to ensure a satisfactory outcome. But first, homeowners must vanquish the negative connotations behind colorful abodes.

To overcome color fear, consider these five tips.

1. Determine Personal Style
When shopping, most people gravitate toward fabric colors they prefer wearing. Elect paint colors that mimic personal wardrobe to complement mood and personality. Stepping out of the box is encouraged, but comfort and relaxation should come first. Use common clothing shades as the base colors for interior designs, and then add daring pizzazz in small, bold splashes.

2. Research Schemes
Once homeowners determine the best fundamental shades for their dwellings, they should consider secondary colors. For instance, individuals preferring dramatic looks might gravitate toward opposing
colors such as blue and orange, red and green or violet and yellow. Also referred to as complementary colors, pairs should consist of one chief shade and one counterpoint showcased through accessories and accents. Use standard color wheels to determine optimal combinations, or review online design boards to gather ideas for chic, eclectic color arrangements.

3. Collect Samples
No two rooms are alike, even painted the exact same color. Sun exposure, artificial lighting types and dimensions all create unique versions of the same paint. Therefore, relying solely on friends’ homes or images online to figure the best shade for a particular space is discouraged. Avoid wasting money on paint cans full of undesired tints by requesting samples at local hardware stores. Testers come in miniature cans and cost around $3 per container, which is a major savings compared to $30 for full-size gallon cans.

4. Test First
After purchasing desired samples, apply paint in small patches on various walls to see if color shifts throughout the day. To save time, homeowners can purchase “small walls,” which are paint sample boards with adhesives backs. These innovative do-it-yourself tools allow homeowners to move and stick potential colors to observe various light differentials without actually painting walls.

5. Use Accents
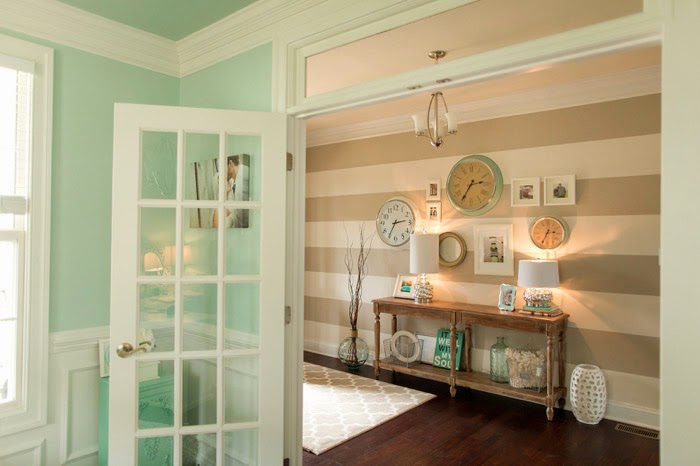
Painting all four walls of rooms in a single, bright shade might be difficult for neutral-loving homeowners. Rather, consider applying paint to one focal wall. Landlords sometimes require their tenants to repaint leased homes in original shades prior to moving out, so accent walls are viable options for leaseholders aiming to avoid unnecessary work. Additionally, white wainscoting covering the bottom third of walls helps limit the overwhelming saturation of color for homeowners who prefer consistent looks instead of accent walls. Wainscoting is more traditional than contemporary accent walls at home.

Trial and error is the key to selecting the perfect palette, and homeowners’ tastes likely change throughout time regardless of current selections. Therefore, don’t be disappointed when first, second or third selections don’t work out in the end.

By Jennifer Riner of Zillow

Ceiling Fan Makeover

Tuesday, August 19, 2014

Thank you. 

My readers... 

you. are. amazing.

First and foremost, I have been the biggest slob kabob lately...

And for that, I offer my deepest and most sincere apologies.

I've neglected this blog, and I should be ashamed of myself.

And I am.

But...

To ALL of my readers who left me sweet, encouraging comments...cheering me on and motivating me to get back to what I love... Thank you.

Seriously. Thank YOU.

I saw each comment you left, and it warmed this little momma's heart.

You, yes, YOU...simply ROCK.

________________________________________________________

Okay, moving forward!
.................

Let's talk ceiling fans, shall we?

They are practical, functional...some would even say essential (me, me, ME!)

But, from a design point of view.... not so very pleasing to the eye.

I mean, when I'm scrolling through the 'Home' section of Pinterest or Houzz, and I see these gorgeous living rooms featuring stunning light fixtures... and then I look at my basic, oh-so-stark, ordinary little ceiling fan...

I get straight up 'light fixture' envy =\

So, you might ask... Why not trade in the humble 'ol ceiling fan for a smashing, swag-tastic chandy?

Good question...and I have my reason(s).

I. Just. Can't.

I can't give up the functionality of my trusty ceiling fan. My living room ceiling is vaulted, and without that 'aesthetically unattractive machine' doing its job, the air flow in there would be terr-i-ble.

I'm afraid it's function over fancy this time, ladies! (& gents?)

But... I have to believe that I'm not the only person out there who has dealt with this dilemma..

So, I set out to try and solve this problem...for myself...and for YOU!

:)

I wanted to have the best of both worlds...function and fancy!

Okay, maybe not 'fancy'...

But, at the very least, interesting!

I did some online research....(ahem, I totally just typed in 'ceiling fan chandelier' into the Google search bar...)

...and to my complete shock, found quite a few 'ceiling fan chandeliers'

So exciting, right?!

Yea, totally... if the price tags on these beauties hadn't been the equivalent of buying a seat on the Virgin Galactic!

But despite my shock and horror at the ridiculous price tags... I was inspired to come up with a DIY way to dress up my fan... on the cheap cheap!

And here's a little before and after...


Ummm so yeah... this picture was taken like 5 minutes after we moved in... and obviously a LOT has changed in this room since then.... and you can >barely< see the fan...

But the sad truth is, I totally forgot to snap a before picture... and this truly is the ONLY picture I had of the fan 'pre-makeover.'

So, unfortunately, it will have to do =\

BUT... here's the after!


So let me give you a quick rundown of this makeover.

In the before picture, you can see that the fan was previously black... and fortunately enough, I discovered that the flip side of each blade was a much lighter, neutral wood tone. 

Score!

Otherwise... I was ready to break out some paint on this baby.

Also, you'll notice in the before picture that there was no orb 'thingy' attached to said fan.

That, my friends, was made by me for FREE.

That's right.

Free!

I used twine, Mod Podge and a beach ball... all of which I had on hand :)

If you don't have these things on hand, no worries! This project is still super affordable.

Here is a great tutorial on how to make the orb by The Design Pages.

After my orb was dry and ready to be added to the fan, I cut an opening at the top big enough to fit the glass light shades in (I left the light shades on because I was a little nervous about having the twine right up against a light.)

I was worried that gravity and the warmth from the bulbs would cause my orb to go a bit limp... but after about 3 months of having the orb up, it's still holding up great!

And if she ever starts looking sad... I'll just make a replacement!

Still SO much cheaper than going out and buying a whole new 'fancy fan.'
___________________________________________________________________

So there ya have it folks!

a cheap and quick fix for a boring fan :)


Design Dilemma!

Thursday, April 17, 2014


If you've read any previous posts, you know that we haven't lived in this house for very long.

Around 3-4 months.

In that time, it seems like we've made a lot of progress.... but I still find myself looking around at bare walls and 'emptiness' and feeling like our progress is slackin'...

We've stayed busy since moving in, but it's this 'new' stage that I'm just not liking.

It doesn't feel home-y yet.

Not enough memories have been made here. We've not had any major milestones here, yet.

My oldest son (4) is still asking me when we're going back home.

Part of the reason I started this blog was to not only watch the progress of this house... but to watch the progress of our family as a whole, here in this place.

And I feel like it's my job, my sacred duty to turn this 'house' into our home. To make it a place my husband loves coming home to, a sanctuary for us, a place of comfort for our children.

When I 'decorate' I'm not just hanging pictures and painting walls... I'm pouring my heart and soul into every detail of the place that holds the people dearest to me. Because, to me, without the love that goes into making a house a home, this is just a building... nothing special.

And it takes time to mold it into what we as a family and as individuals need.

This whole spill may seem completely out of place, but I felt it necessary to let you know why I do what I do.

And now you know :)
........................................................


Okay, enough of the heavy!

I'm in a design dilemma, for real!

I'm getting ready to spruce up our foyer and hallway, and I can't seem to get it together.

I thought I knew what I wanted to do... but I keep wavering between a few different ideas.

First, let me show you 'said' foyer/hallway. 


Plain. Boring. But a completely clean slate.

I'm craving life in here!


Now, let me show you a few different design directions I'm considering

:)

Stripes

 Katelyn James Photography
From Katelyn James Photography

Okay, so stripes aren't a new concept, far from it...

But they are classic and simple and stunning. Period.

I want to add warmth and life in a subtle way... and allow my accessories to be bold without being too busy. 

This room is fabulous and tasteful.

I'm a fan!


Faux Bois
Vintage Revivals

I love faux bois... and this painted concrete floor by Vintage Revivals left me in awe.

So I thought about doing something similar to our foyer's walls.

Hand painted by me... with a soft ivory background and bold gold lines.

In keeping with our cottage-y feel, I think this would put a modern twist on things.

Planked Walls

No matter what we do... our foyer will never be this awesome.

Our foyer wishes!

This one is probably my favorite.

But the way our foyer and living room are made/joined, we want to have our living room completely finished before adding planks to the foyer. Just to avoid any future complications.

That's vague, I know. But when the time comes, you'll understand :)

So this is what our foyer wants to be when it grows up.

But probably won't be happening for a while.

In the meantime, I just want to add a little bit of interest for a temporary fix.

Is that crazy?

Probably.

That's okay :)

................................................

So, within the next few days I'm going to come to a concrete conclusion and get to work!

And you know I'll be back, to show you how it turned out!


Ceiling Makeover (Noah's Room)

Monday, April 7, 2014


So that was Noah's room before ^^^ There it is, in all of its 'before Mom had the best idea EVER' glory.

I just don't like plain... I don't care for 'well enough.'

I aim for awesome.

Before we even had everything moved into our home, I knew I wanted something done to our boys' ceilings. The textured ceilings... those 'boob' lights. Yuck.

I just didn't know what I wanted to do to them, yet.

But once I figured it out, there was no stopping me, or talking me out of it. My mind was made up.

So, let's talk beadboard. Have you heard of it? Well if you have, I hope you've discovered the many wonderful things you can do with it to add some extra texture and charm to just about anything!

In this case, we added it to our oldest son's ceiling! And just so you know, we are total professionals and didn't have any problems whatsoever during this project.

Ha, right!!!!

 Actually, we are total amateurs and had one thing after another go wrong! But in the end, we pulled it together and it was all so worth it. 


So much better right?!

Originally, the ceiling was supposed to be beadboard only, without the addition of any crossbeams.

But lemme tell you, we had the worst most impossible time ever trying to hide the seams until we finally realized it just wasn't gonna happen.

And I wasn't about to have this ceiling showing seams left and right. 


At this point of the project, we felt like total failures. What were we thinking?! Why did we assume we could do this?!

Well, that was mainly how I was feeling. My husband on the other hand, was calm and collected ( as always) and confidently told me we would figure it out.

He's awesome like that.

After his boost of confidence, I came up with the idea of the crossbeams! Which in the end, I wound up loving even more than the beadboard alone.

The above picture was taken before we caulked the seams with paint-able caulk, because I forgot to take a picture of that. But it really didn't look much better than the picture you see.

The seams going along side the beadboard (running the length of the beadboard) were easy as pie to hide... it was the dreadful seams running in the opposite direction of the beadboard that were so impossible and super tacky looking.

Something had to be done. Further measures had to be taken. And it still had to look adorable.

In my humble opinion... I think we nailed it :)


Now, I'm probably not the greatest at giving instructions...mainly because I get sidetracked way too easily...and because I feel like we honestly didn't have a clue what we were doing when we started this... But I'm going to try my best to give you a simple run down of how we achieved this look.

What You'll Need:

Beadboard (Lowe's & Home Depot sell them in sheets)
Crown Molding (this room didn't have any before)
1.5" MDF planks (for the cross beams)
Nail Gun
Paintable Caulk (we got ours from Lowe's)
Sand paper (or an electric sander)
White Trim Paint
Tape Measure
Skill Saw
Jigsaw
Stud finder

Instructions:

1. Prime the backside of the beadboard with a paint primer. This will help the beadboard stay in place during weather changes (which can cause the boards to shrink and expand.)

2. Measure the room's ceiling. Also measure any openings that will need to be cut out with the jigsaw (air vent, smoke detector, light fixture etc.)

3. Once you have all of your measurements and have all of your beadboard cut to size, you must find all of the ceilings studs. (you will need to find the wooden studs in the ceiling because that's what you are going to nail the beadboard to, otherwise it will not hold.)

4. Install the beadboard with a nail gun, this will make the process much much easier.

5. Once all beadboard is installed, add the molding. (this is more of a preference, I think molding makes the outcome much more polished and put together.) Cut your molding to size and attach it with a nail gun and/or liquid nails.

6. Once all of your molding has been installed, it's time to add the crossbeams.

7. Time for a little math. We took the ceiling's measurements, decided how big we wanted each square to be, did a little math and came up with how many squares that would give us. I'm terrible at explaining this part, but I think it's pretty self explanatory (I hope!) And they don't have to be square like ours, the design possibilities are endless!

7. Once you have the measurements for the crossbeams, cut the MDF accordingly.

8. Install the crossbeams, with the nail gun.

9. Caulk all seams and fill all nail holes.

10. Once the caulk is dry, sand it down smooth and wipe it clean.

11. Paint it all (molding, crossbeams and beadboard to give it a unified look.)

12. Install light fixtures, air vents, smoke detectors etc.

DUNZO!

I hope that was explained well enough! This is definitely not a job for one person. I would at least have two people working on this... and 3 sure wouldn't hurt! 


I'm in love with the end result!


We still have a looong way to go in this room... but it's getting there!


Board & Batten Wall

Monday, March 24, 2014

I'm excited to talk to you about my favorite project to date, our board & batten living room wall!

One thing you should know about me:

I'm a sucker for charming character.

When we bought our home earlier this year, I was well aware that the style of this home wasn't exactly what I wanted. I love unique features, lots of character, truckloads of charm. 

Basically, I want a cottage. A cozy, old cottage.

But I live in Tennessee... and we seem to have a shortage of such things!

I knew immediately that I wanted to transform our cookie cutter home into our dream home. Anyone can add charm, it's all in the details!

This board & batten wall was a step in that direction.


Yeah, I had to keep it real on the before picture!

We'll call that the 'junk corner.'

Classy.


In this picture you can really see how the wall color, couch color, and carpet color are all running together.
The flooring will eventually be changed out to hardwood, but something had to be done about that wall.


Let's get ready to rumble! My mister, starting the task of measuring and marking :)


Woohoo!! Progress.


....Almost there!!!


Seriously, such a big difference. 


Eeeeek! I'm over the moon for this wall, and it's not done yet!

Next, we are going to add a shelf that runs along the top of the board & batten wall. And I will fill it with pictures and such ;)


This project took us around 3 days to complete.

Total cost was right around $120.

Not too shabby :)


XOX,
Amanda


About an Armoire

Thursday, March 20, 2014


 Originally, I had no idea where I was going to put our armoire. I was absolutely going to incorporate it somewhere, but it isn't small so I couldn't just shove it in some corner and be done with it. Besides the fact that I think it's a lovely piece, it has history. It was my husband's childhood armoire, and when we were first married it came with him. In our first home, we had it in our master bedroom. Then, it got a makeover and went into my youngest son's nursery.

It gets around.

In our new home (which happens to be house #2 for us) I couldn't see it fitting in to our master bedroom or either of the boys' rooms. 

Dilemma.

But our living room is quite big, and once I saw it sitting in the living room I knew it had found its new home! 

Now, I know that it's part of a bedroom set and not intended for a living room... but I really don't care. I like it in there! Besides, isn't this an exciting time in the world of home decor... a time of 'rule breaking' and following your little decorating heart?!

Yes, yes it is. Thank goodness!

Obviously, my rule breakin' isn't too extreme... yet... but stick around, it's bound to get crazy!

Anyways, rambling here.

So, our little armoire had found its new home and all was well with the world... but the longer I looked at it... the more it bugged me. 

Not so much the armoire itself, but its color.


*Please excuse the random cardboard wrapping paper thingy, but my house has little ones who love to add their own flair to things ;)

I knew from the beginning that I wanted this new house, our new home, to be filled with light. I wanted to walk in to each room and it feel like a breath of fresh air. I love color, don't get me wrong, but I wanted it in splashes, here and there. I wanted the color in each room to pop when I wanted it to. I wanted our furniture, wall colors, flooring etc to each have character but also serve well as a canvas. So that at any time I could splash colors here and there, and they would really stand out. And once I was tired of those splashes, I could easily change them.

I was really loving the progress of the living room, but the pieces just weren't meshing as well as I'd hoped. Every time I walked into the living room, my eyes were immediately drawn to the armoire. And it wasn't giving me the light, airy feeling I was searching for. 

Time for a makeovah!

I consulted with a couple of family members about my plans to paint the armoire a really light color... white to be exact. My grandmomma was most concerned. She was afraid it would all be 'too light.' I had to admit, I had the same fear... the fear of blandness.

But my heart longed for a change, and caution to the wind, I went for it!

Once more, the before picture, for comparison.

Drum roll, please..............


Ahhhh, there it is! That 'breath of fresh air' feeling I was searching for! 

At last, my vision realized. Coming to life before my eyes. 

My heart soared, birds sang, and this little house wife was finally at peace.

For like, 2 seconds, before realizing my next project for this room.

But boy were those 2 seconds super fulfilling!


This room still has a loooong road ahead of it, but she'll get there... one day at a time, one project at a time...

In the meantime, I'll be here... planning, plotting my next move

:)

-Amanda

And so it begins...

Wednesday, March 19, 2014

When we moved in to our new house (some time in January?) I was already itching to start creating. 

Something. Anything. 

I just wanted to make something beautiful for our new place. Ya know, kind of put our mark on it, our claim on it!

Since, we hadn't come up with any big plans as of yet, and I'm not one to just jump into a huge 'reno' without really thinking it through (I've got commitment issues when it comes to home decorating) I decided to stick with something smaller. Less damage would be done that way.

While surfing Pinterest, part of my home decor Bible, I had run across so many stunning chalkboards; big chunky chalkboards featuring meaningful (and sometimes super fun) quotes. I was immediately in love with the idea of having a chalkboard a part of our home. And not just some little chalkboard either, I wanted a statement piece!

After getting online and doing a little window shopping, I quickly realized that I did NOT and was NOT going to pay retail price for one of these babies. 

For the chunky/vintage look I wanted, I would have to spend in upwards of $200 for a 'ready made' one. 

Not happenin'

Not for a decorative item that I could just make myself. 

And did.

For around $45.

After a quick trip to Hobby Lobby (or The Lob as it's known around here) I was ready to get started!

Did you know that every other week Hobby Lobby puts their frames on sale for 50% off? 

Well, they do and I snagged one up for one heck of a steal!

Threw a couple of bottles of chalkboard paint into the mix, and a scrap piece of plywood we had hanging around in the garage, and viola. Dunzo!


Now, obviously my lettering needs divine intervention, but that I can work on!

But that chalkboard, well, she's near and dear to my heart. My very first project/craft here in our new home, and she's just beautiful!

......now I just have to figure out where to stick her =/

............

Thanks for reading along!
-Amanda

Oh, hello there!

Thursday, March 13, 2014

Hey y'all! I'm so very excited to finally be putting this blog together and showing all of the things my husband and I have been up to lately. But before we get to all of that fun stuff, let me introduce myself and my blog.

 My name is Amanda and I'm a happily married wife and mother of two. I'm a southern girl born and bred in the beautiful state of Tennessee.... and I love DIY decorating. And that leads us to the introduction of this blog :)

No matter what the project is, I love to document everything my husband and I do around our new home. Seeing the transformations, all of the before and afters, just give me the motivation to keep moving forward with new and exciting undertakings. I'm kind of addicted to making this house our home. 

My husband; my precious, patient, hardworking husband is basically the muscle/contractor/calculator/carpenter behind every project. I pretty much just come up with all of the ideas, sketch them out, give them to my husband, and photograph HIS work :)

We make a great team ;)

So please stick around to see what adventure we'll take on next!

-Amanda
Proudly designed by Mlekoshi playground