

If you've read any previous posts, you know that we haven't lived in this house for very long.
Around 3-4 months.
In that time, it seems like we've made a lot of progress.... but I still find myself looking around at bare walls and 'emptiness' and feeling like our progress is slackin'...
We've stayed busy since moving in, but it's this 'new' stage that I'm just not liking.
It doesn't feel home-y yet.
Not enough memories have been made here. We've not had any major milestones here, yet.
My oldest son (4) is still asking me when we're going back home.
Part of the reason I started this blog was to not only watch the progress of this house... but to watch the progress of our family as a whole, here in this place.
And I feel like it's my job, my sacred duty to turn this 'house' into our home. To make it a place my husband loves coming home to, a sanctuary for us, a place of comfort for our children.
When I 'decorate' I'm not just hanging pictures and painting walls... I'm pouring my heart and soul into every detail of the place that holds the people dearest to me. Because, to me, without the love that goes into making a house a home, this is just a building... nothing special.
And it takes time to mold it into what we as a family and as individuals need.
This whole spill may seem completely out of place, but I felt it necessary to let you know why I do what I do.
And now you know :)
........................................................
Okay, enough of the heavy!
I'm in a design dilemma, for real!
I'm getting ready to spruce up our foyer and hallway, and I can't seem to get it together.
I thought I knew what I wanted to do... but I keep wavering between a few different ideas.
First, let me show you 'said' foyer/hallway.

Plain. Boring. But a completely clean slate.
I'm craving life in here!

Now, let me show you a few different design directions I'm considering
:)
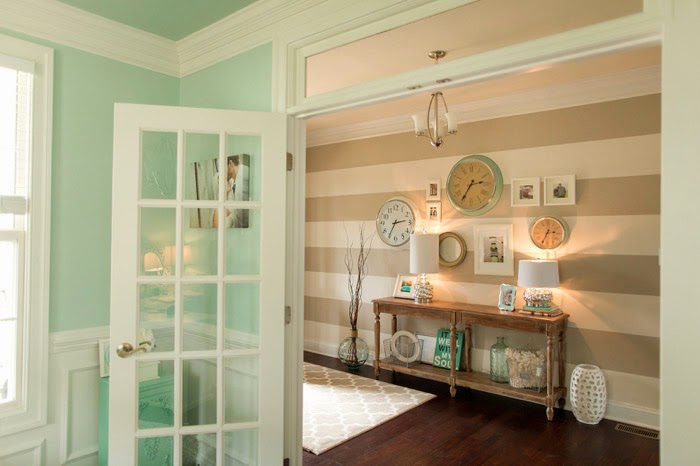
Stripes
 |
| From Katelyn James Photography |
Okay, so stripes aren't a new concept, far from it...
But they are classic and simple and stunning. Period.
I want to add warmth and life in a subtle way... and allow my accessories to be bold without being too busy.
This room is fabulous and tasteful.
I'm a fan!
Faux Bois
 |
| Vintage Revivals I love faux bois... and this painted concrete floor by Vintage Revivals left me in awe. So I thought about doing something similar to our foyer's walls. Hand painted by me... with a soft ivory background and bold gold lines. In keeping with our cottage-y feel, I think this would put a modern twist on things. Planked Walls  No matter what we do... our foyer will never be this awesome. Our foyer wishes! This one is probably my favorite. But the way our foyer and living room are made/joined, we want to have our living room completely finished before adding planks to the foyer. Just to avoid any future complications. That's vague, I know. But when the time comes, you'll understand :) So this is what our foyer wants to be when it grows up. But probably won't be happening for a while. In the meantime, I just want to add a little bit of interest for a temporary fix. Is that crazy? Probably. That's okay :) ................................................ So, within the next few days I'm going to come to a concrete conclusion and get to work! And you know I'll be back, to show you how it turned out!  |


